With the recent release of MLOPS for Houdini, I've been interested in Python libraries for image processing. One such library is OpenCV. The pip-installable version of OpenCV mostly runs on a CPU and uses OpenCL to accelerate some functions. However, it is necessary to compile OpenCV with CUDA support to accelerate features like tracking and image warping.
I recommend not skipping any steps in this article because it can lead to compilation errors or problems installing the compiled package. I've tried to shortcut on every step, so believe me :)
To start with, I'll briefly list what we'll need:
1. Installing the CUDA Toolkit
CUDA allows software to use graphic cards from Nvidia for data processing.
Download and install the CUDA Toolkit with an NVIDIA graphics card on your PC. I will be using CUDA 11.8 because the MLOPS nodes use this version at the time of writing this article. Use Express settings during installation; we will install cuDNN to a folder of CUDA installation next.

2. Installing cuDNN.
CuDNN is a GPU-accelerated library for deep neural networks.
OpenCV supports DNN, so we must install it to compile the package successfully.
To download cuDNN, register and sign in on the https://developer.nvidiathe.com website.
During registration, if you are not associated with any organization, then in the mandatory field "Organization name", specify "Individual".
- After registration, go to the cuDNN download page:
Click on Download cuDNN v8.9.1 (May 5th, 2023), for CUDA 11.x , then Local Installer for Windows (Zip).

Download the archive to any folder, for example, C:\Users\Aleksandr\Documents\Sources\
Unpack and open the folder: ex. C:\Users\Aleksandr\Documents\Sources\cudnn-windows-x86_64-8.9.1.23_cuda11-archive\cudnn-windows-x86_64-8.9.1.23_cuda11-archive.
To install cuDNN, you need to select and copy the bin, and include, lib folders from the downloaded cuDNN directory to the directory where CUDA Toolkit is installed: C:\Program Files\NVIDIA GPU Computing Toolkit\CUDA\v11.8 by default. Copy all three folders with replacement.

3. Installing Visual Studio
OpenCV sources are written in C++, and we need Visual Studio software to compile them into a Python package.
Download the Visual Studio Community 2022 version.
 Run VisualStudioSetup, after which the Visual Studio Installer will open. Here, we should select all the necessary components.
First, we need to check "Desktop development with C++",
and on the right, we will need the following optional components:
- MSVC v143 - VC 2022 C++ x64/x86 building tools
- C++ ATL for the latest v143 build tools
- Windows 11 SDK
- Just-in-time debugger
- C++ Profiler tools
- C++ CMake tools for Windows
- C++ Address Sanitizer

Second, we need "Python Development":
- Python 3 (64-bit),
- Python Native development tools,
This way, we install Python inside Visual Studio and guarantee the creation of an OpenCV package at the end of this article.

Press Install.
3. Installing Numpy.
NumPy is a Python dependency often used with OpenCV to manipulate and process images and videos efficiently. We need it to build OpenCV.
Open Command Prompt in Windows 11:
Press Start - Type "CMD" - Command Prompt

Install Numpy through pip Python's package manager:
Type: py -m pip install numpy
Press Enter

4. Install CMake
CMake automates the generation of build files for various platforms. We need it to generate Visual Studio project files from downloaded OpenCV sources.
Download Cmake and install it in the default location.

5. Download OpenCV sources
This is the original source code of the OpenCV project.
Download and unpack the OpenCV source files into any folder, for example, C:\Users\Aleksandr\Documents\Sources\opencv-4.7.0.
6. Download OpenCV-contrib files
OpenCV-contrib is a repository of additional modules and extensions for OpenCV. We're going to get CUDA modules from it.
Download OpenCV-contrib files and unpack them into any folder, for example, C:\Users\Aleksandr\Documents\Sources\opencv_contrib-4.7.0
 GitHub - OpenCV/OpenCV_contrib - Tags - 4.7.0
7. Create a Build folder
We need some folders to Cmake generate project files into.
Create an empty folder, "Build," to store opencv project files for the building. For ex. C:\Users\Aleksandr\Documents\Sources\Build

8. Run Cmake

After that, the CMake window will open, where we will prepare the Visual Studio project for launch:

In "Where is the source code" press the "browse source" button and select the folder where we extracted opencv source code previously. For ex. C:\Users\Aleksandr\Documents\Sources\opencv-4.7.0
In "Where to build the binaries," press "browse build" and select Build folder, which we created previously. For ex. C:\Users\Aleksandr\Documents\Sources\Build
Press the Configure button.
Configure window - Optional platform for generation - select x64 - Press Finish
Type the next variables in the search field:
WITH_CUDA : Check
ENABLE_FAST_MATH : Check
BUILD_OPENEXR : Check
BUILD_opencv_world : Check
Also, we need to set the path to the folder where additional OpenCV modules (opencv_contrib-4.7.0\modules) are stored:
OPENCV_EXTRA_MODULES_PATH : C:/Users/Aleksandr/Documents/Sources/opencv_contrib-4.7.0/opencv_contrib-4.7.0/modules
Press the Configure button again.

Now we can configure CUDA module variables:
CUDA_FAST_MATH : Check
You must check the Compute capability (version) specific to your graphic card here. For example, I have a graphic card, Nvidia RTX 3060, and its computing capability version is 8.6
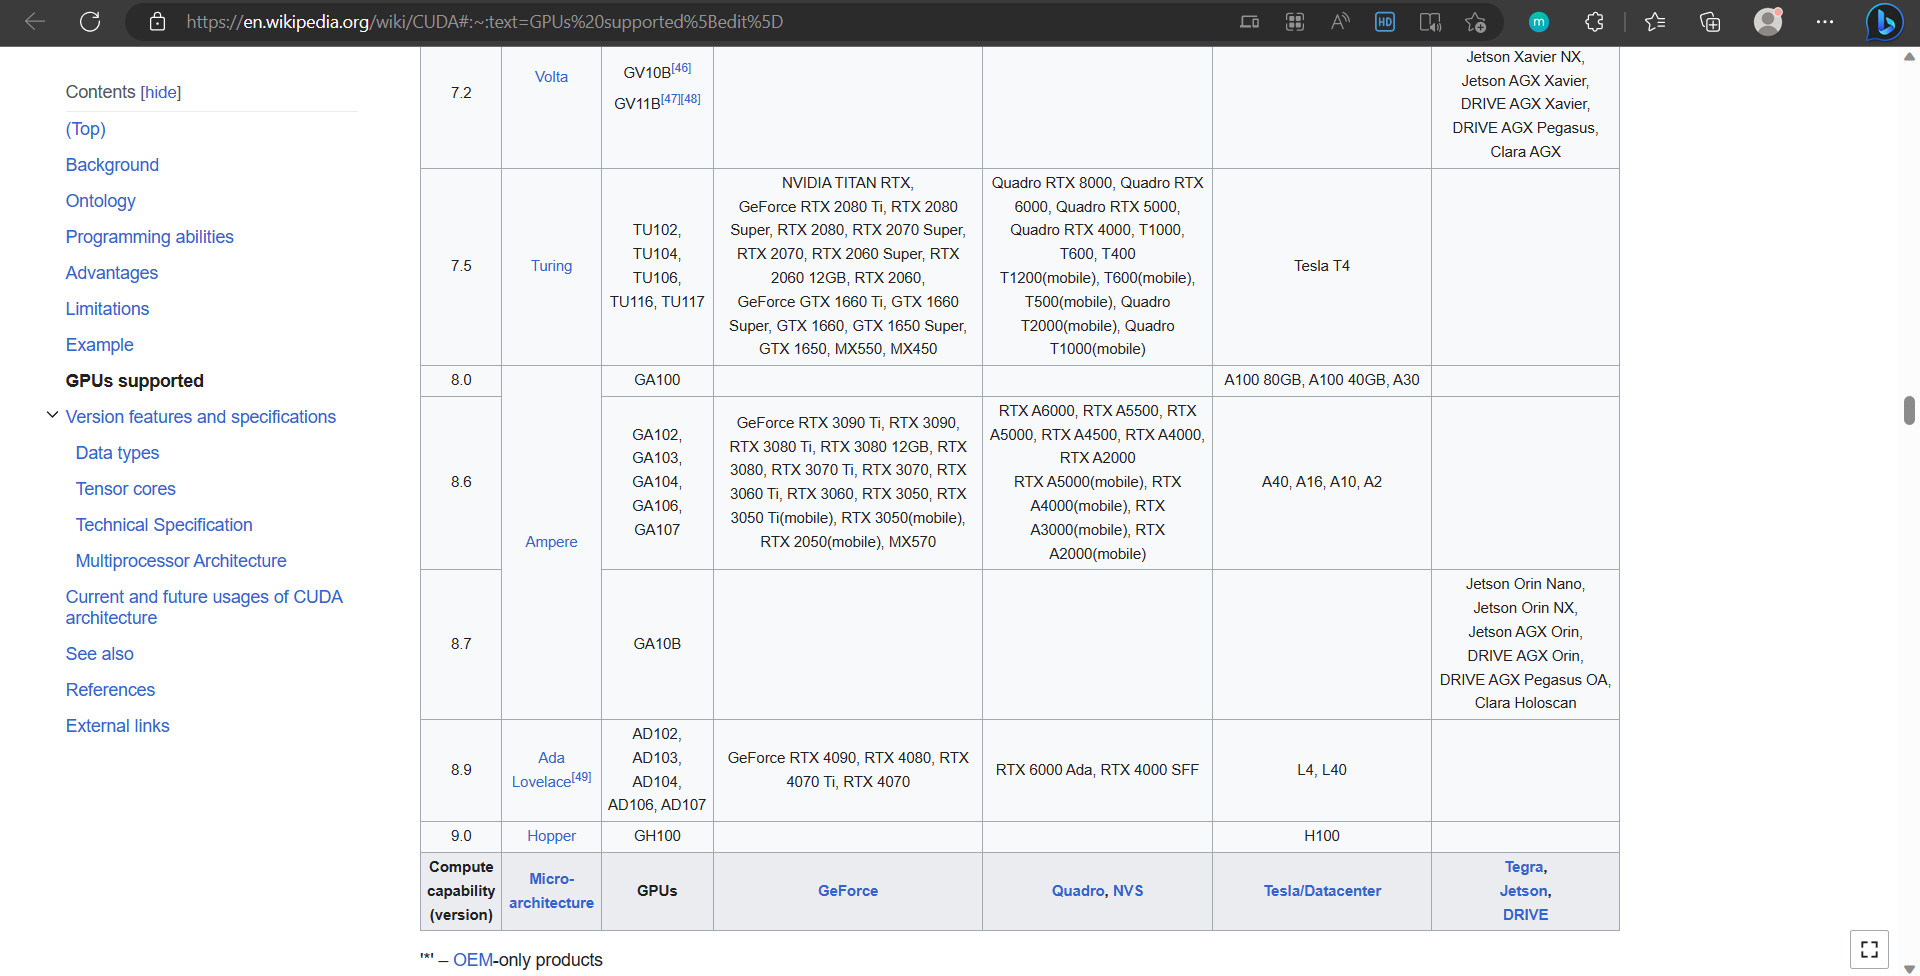
CUDA_ARCH_BIN : 8.6
We don't need to debug the project, so change the next variable to Release only:
CMAKE_CONFIGURATION_TYPES : Release
Press Configure.
Press Generate.
Press Open Project.
After that, there will be a configuration, the first launch of Visual Studio, and the OpenCV project will open, which we will compile.
9. Build and Install OpenCV in Visual Studio

When Visual Studio and the project open, in the right-hand window Solution Explorer, expand the CMakeTargets tab.
In the tab, Right Click on ALL_BUILD - press BUILD
Wait, this building process may take a long time.
Next, Right-click on INSTALL and press BUILD.
The result of the installation is a new cv2 folder in the Python directory of Visual Studio:
C:\Program Files (x86)\Microsoft Visual Studio\Shared\Python39_64\Lib\site-packages\cv2

10. Copy and check the OpenCV package in Houdini
We must copy the OpenCV package to the directory where Houdini's hython can find it.
If you are not using MLOPs, it can be a directory in your Houdini user preferences: C:\Users\Aleksandr\Documents\houdini19.5\scripts\python .
If you are using MLOPs, go to the folder where you store MLOPs data: $MLOPS/data/dependencies/python, for example, C:\Users\Aleksandr\Documents\GitHub\MLOPs\data\dependencies\python. Then, backup copies of the cv2 folder to any location and delete it.
Copy the cv2 folder to the target directory from C:\Program Files (x86)\Microsoft Visual Studio\Shared\Python39_64\Lib\site-packages.

Launch Houdini.
Open Windows - Python Source Editor
Type the code:
import cv2
count = cv2.cuda.getCudaEnabledDeviceCount()
print(count)
This code will output the number of devices that support CUDA computations to the console.
If this number is greater than 0, for example, 1, you have successfully installed OpenCV with CUDA support in Houdini.

Related articles:
How to build OpenCV with Cuda and cuDNN support in Windows – 2023
Quick and Easy OpenCV Python Installation with Cuda GPU in Under 10 Minutes